
As we all know, many countries are legalizing the use of medicinal weed across the world. This has influenced many users to purchase weed from dispensaries and even cultivate it in their own homes. Here is our how to: Growing weed: using AMBS’ Marijuana Seeds
While many countries have legalized the cultivation of cannabis, most people don’t seem to take advantage of this opportunity due to the opinion that it is costly and time-consuming. Don’t allow lazy people to discourage you; if done correctly, cultivating weed is cost-effective and fun.
Well, if you have just started growing weed, or are thinking about it, we will give you a guide to get a successful harvest. Our guide is user friendly and precise.
After reading the guide, you can officially start your cannabis-growing journey!
Given that this is a beginner’s guide, we will learn some basic information about the plant.
Weed is also called marijuana, herb, cannabis, ganja, bud, and a vast of other slang names. Many people smoke weed in blunts while others use bongs. It can also be brewed in tea, especially when it is taken for medicinal purposes.
Biologically, weed comprises of two strains: Cannabis Indica and Cannabis Sativa.
Cannabis Sativa is a marijuana strain that energizes the brain. It is ideal for activities during the day that requires a high level of interaction. On the other hand, Cannabis Indica tends to be relaxing and can make you feel sleepy. For this reason, Cannabis Indica is used to treat conditions such as anxiety, insomnia, and inflammation.
It is also important to note that Cannabis Sativa grows easily outdoors while Cannabis Indica grows well indoors. Regardless of the strain, the flowers and leaves are crushed, dried, and smoked- though there are additional ways to ingest the weed if you are not a smoker.
Factors to consider while growing weed
Below are the main things you should ensure are available when growing weed:
- Air
- Light
- Medium for growing, i.e. soil or hydroponics
- Water
- Nutrients
For the cultivation to be successful, you need to balance, control and understand the above environmental factors. Don’t be afraid of these stages; we will make your work easier. All that you need to conduct is to follow the steps below, and you will be a successful cannabis farmer.
Growing weed

There are two main methods of growing weed:
- Indoor cultivation
- Outdoor cultivation
Selecting the best method depends on what you are planning to achieve and your current circumstances. Well, let us start by growing weed indoors.
Planting weed indoors
This is the most common method of growing weed. However, on the downside, growing weed indoors means that your plant will not get well-nourished. Nonetheless, with proper techniques, it is easier to grow cannabis indoors.
This is because you can easily control all the conditions to suit the plant’s needs. What are the advantages and disadvantages of growing weed indoors?
Advantages of growing weed indoors
- The grower can control the plants growing condition.
- It enables you to control the flowering process; this is not possible if you grow weed outdoors.
- Direct sunlight may affect chemical and enzyme reactions.
- The plant is less exposed to insects and viruses.
- According to statistics, the weed family agrees that weed grown indoors is better than weed grown outdoors.
Disadvantages of growing weed indoors
- Sunlight gives more healthy nutrients as compared to artificial lighting.
- Photosynthesis is more efficient with sunlight.
- Indoor plants may lack proper ventilation.
- It is difficult to regulate humidity, lighting, and temperature; you need to be extremely careful.
- With the indoor growing of marijuana, you are likely to have less space as compared to outdoor growing.
- Plants grown indoors may have different heights as compared to plants grown outdoors in natural environmental conditions. To ensure that the indoor plants have a similar height, you are required to learn methods of plant growth.
Planting weed outdoors
Outdoor planting of weed is alleged to be a difficult task. This is because it depends on the weather conditions and your surroundings. Nonetheless, we are not recommending one technique over the other. You are at liberty to choose the best method that suits your needs.
Let us look at the advantages and disadvantages of growing weed outdoors.
Advantages of growing weed outdoors
- It saves on cost; sunlight is free.
- Natural ventilation is easily available.
- You are not obligated to regulate air, humidity, and temperature; all these factors depend on the natural environment – and you cannot change them.
- The yields are higher than those in indoor planting.
- If you are planting weed for business purposes, you are likely to earn more as compared to indoor planting.
- Weed is much healthier when grown in a natural environment.
Disadvantages of growing weed outside
- It is difficult to control light. Remember that exposure to proper light cycles is the most important factor to consider in the production of weed.
- Extreme weather conditions can easily damage the plant.
- Lack of privacy you are easily exposed to nosy neighbors.
- Can easily be stolen or damaged.
- The plant can only produce once a year, depending on the environmental conditions.
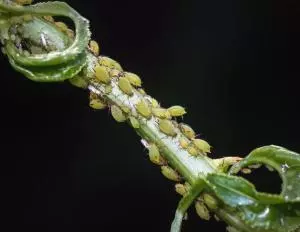
- The plant can easily be damaged by diseases and pests.
- It is also difficult to control the type of strain you are growing due to cross-pollination.
Marijuana growing mediums
There is two major marijuana growing medium; we have highlighted below:
Hydroponics: the most common indoor growing method

This is the most common method of growing marijuana indoors. This method involves growing the plant’s roots in a tube of water. One of the primary benefits of Hydroponics is that it promotes faster growth since the roots do not need to burn up energy as they search for nutrients.
In addition, the plant has an adequate supply of oxygen produced by an air stone that is in the reservoir. Because the plant spends less energy finding nutrients it requires to grow; it directs most of its energy on growth.
If you settle for the hydroponics system, we recommend you use a bubbler bucket reservoir. This system is simple, and it works by suspending the plant’s roots in an oxygenated nutrient solution where they are replenished.
We recommend that you check your plants daily. If you encounter a challenge with the system, the first step should always be changing the reservoir. Challenges such as root rot are common since the plant is consistently submerged in water. Therefore, it is important to establish a routine of changing the water after seven days. You can also add beneficial bacteria to avoid root rot.
It is also important to control air and water temperatures. The air temperature should range between 75 to 85 °F when there is light is on and can drop up to 10 degrees when it is dark. The water temperature should remain constant all the time. Use empty portholes to remove the reservoir water using a pump; it will also allow you to inspect any activities inside.
One major mistake you should also avoid is not inspecting the water PH level. It is an important factor for weed to grow. A dirty reservoir will prevent the roots from accessing oxygen which will eventually make them drown.
Though most people prefer a sterilized reservoir with only water and nothing else alive, you should consider adding some bacteria. Not all bacteria is bad; other bacteria can benefit plants growth.
To prevent the bacteria from becoming harmful, change the water reservoir regularly. Similarly, if you have too many plants in a reservoir, it can lead to the growth of mildew and white powdery. Also don’t cramp the plants together, instead, grow each plant in its reservoir to enable the roots and leaves to spread easily.
You should also set up a water transfer pump to speed up the flushing process. So how exactly do you flush your cannabis plant?
First, flushing a plant refers to the process of removing any salts and nutrients from the plant to improve the taste of the product. You can do this by draining the reservoir and adding neutral water two days to the harvest.
This will provide the plant with time to use up all nutrients contained in the buds, leaves, and nutrients.
We wrote an in-depth Hydroponics guide, so be sure to check it out if you decide to use this method.
Coco Coir: an easy growing medium

This is the second growing method. It is made up of coconut husks and works well as a medium. It can be used alone or with other ingredients. In most cases, it is often added to the soil pots to loosen the soil and retain a lot of water. It also acts as a buffer to reduce any shock stress made by human beings, for example, when human beings add excess nutrients.
Coco is also easy to flush as compared to Hydroponics because you are not required to changes the entire reservoir. Watering the coco coir can be very versatile.
You can decide to flood and later drain the hydroponic system, or you can use tap water to waste system, this means watering the plant until it comes out at the bottom of the reservoir.
Using coco coir for the growth of cannabis is great for root development. For beginners, a ratio of 3:1 coco to perlite fusion is recommended since it requires a small amount of water and holds nutrients and moisture better. However, if you are an experienced grower, then coco to perlite ratio of 1:1 is recommended.
There are a few mistakes that farmers make when growing cannabis with coco. For instance, they allow the coco to get too dry and also forget to check the plant’s PH. These two errors are critical and can lead to deficiency symptoms.
It is also important to add calcium and magnesium to the coco coir. Calcium is instrumental in root development of protein synthesis and nutrient uptake. Magnesium plays a major role in producing chlorophyll, speeding up photosynthesis, and aiding in the synthesis of proteins. With the precise amount of calcium and magnesium, the plant will remain healthy.
Soil

While growing weed in compost-enriched soil won’t give you the most yields, some potheads purport that it is the tastiest weed that can ever get grown. Soil is beginner-friendly and inexpensive, which renders it appear in this list.
The disadvantage, though is that soil can harbor pests and diseases, and also the fact that not every other soil you see out there is fantastic for growing cannabis.
That is why a lot of growers add worm compost to the soil, to give the plant all the necessary nutrients and protect it from pests.

Step by step weed growing guide
There are a fantastic couple of ways, to begin with; for instance, you can cut the weed from an existing plant. Nonetheless, for beginners, we recommend that you start by growing a seed. The success of planting a seed is 85% while that of growing a cloned plant is less than 50%.
Step 1: Select quality cannabis seed
If you are looking to have a great harvest, look for quality seeds. You can acquire the seeds from experienced suppliers, or you can find seeds in your current selection of buds. How do you select seeds that are worth growing?
First avoid green seeds, damaged seeds, or soft seeds. They are not mature for germination. Also, have in mind that the seeds may or may not be chemically treated; hence they life span is not guaranteed.
Cannabis beans ought to have a hard shell. So what you need to look for are brown, dark, and teardrop-shaped seeds. Indica seeds have dark tiger strips while the Sativa seeds are black, brown, and tan mottling.
There is also a difference between normal and autoflower plants. Autoflowers give you a smaller plant and less harvest, but it is much easier to grow because it flowers after a certain amount of weeks, instead of based on the amount of light.
Step 2: Germination of seeds

After selecting the best seeds, the next stage is germination.
Germination is the process by which the seeds shell breaks down when subjected to the right environmental conditions such as air, moisture, and warmth. During germination the root sprouts from the seed dropping downwards.
A crucial point you need to bear in mind is that out of 10 non-feminized seeds, only two or three will develop into healthy female plants, the others grow as male or become spoiled. You should consider this when deciding how many seeds you need to germinate.
Cannabis seeds take about two to seven days to germinate, but the period may differ depending on moisture, the quality of the seed, and temperature. After this stage, you are required to observe your plants and remove all less developed and male sprouts and focus on female plants.
If the germination process produces fewer female plants, then you can begin another germination process. You are also advised to germinate the plant in the hot months; it proves to be more effective.
A growing mat can assist in the germination process but at an extra cost. After the seed has germinated, the root grows longer until it is a quarter inch. At this time, you can transfer it to another pot where it becomes a baby plant. After this, it will be transferred to a hydroponic or garden system.
There are several techniques to germinate a cannabis plant. But you are advised to try them on common seeds first, instead of wasting expensive cannabis seeds. The different methods of germinating seeds include:
Soaking
This is the most effective method of germinating marijuana. With this method, you only need a cup filled with some warm water.
Add some warm water into a cup, then add the seeds. If the seeds float at the top, remove them. The other step involves covering the cup with a lid that is too tight to prevent light from accessing the seeds inside. The process is expected to take 48 hours; however, some seeds sprout within 24 hours.
Soil germination
Some farmers may germinate seeds in the soil – it is also an easy method. With this method, you are required to fill a pot with soil, then pour some water in it, and drain it from the bottom hole.
Then dig some soil from the surface and push down a pencil or any pointed tool downwards, about a quarter inch. Now you can place the seed and fill the space with the already dug soil from the surface.
Also, spray water to keep it moist until you see a small sprout developing from the soil. Remember that germination occurs at room temperature, which is 78 degrees Celsius. Normally, this method will take 5 to 7 days for seeds to germinate.
Propagation kits
These kits are cheap and deliver great results.
They come with an instructions guide, but normally you need to pour the seeds into a tiny pot, and then add a germination nutrient mix that comes with a kit. You can also create your propagation kit, though purchasing a new one from the market doesn’t cost you a lot.
The paper towel method
This method comprises two dishes, some water, and two paper towels.
With this method, you need to boil some water and rinse the two dishes with it to ensure that all the germs are destroyed. Later soak the paper towels in the water so that they can become damp and warm.
Then lay one of the paper towels on a dish and place some seeds on it, cover the seeds with another paper towel and use a dish as the lid. Covering the dish with a lid is essential to prevent light from accessing the environment.
With this method, seeds take 2-5 days to germinate. Remember that you should not leave the seeds on a towel for a long period, transfer them as soon as you see the sprouts.
Using peat briquettes for germination
With this method, you are required to soak the peat briquette in water and allow it to swell. Later push a seed into the hole. Ensure that the temperature is hot; it should be approximately 95 degrees Fahrenheit.
Also, keep the seeds moist and wait for the sprouts to emerge. This method is regarded as the most reliable method for germinating the seeds. You can select any of the above methods but go with the one that best suits your needs.
Step 3: Handling cannabis seedlings

As soon as the sprout becomes a quarter-inch long, you should replant it into a pot where it will grow into a plant.
The seedling comprises of two leaves and is commonly referred to as a cotyledon. The cotyledon stores food to ensure that the plant is healthy. When all the leaves develop, the cotyledon becomes paler and yellow; then it drops down.
During this stage, the plant requires intense care. Don’t water the plant too much- this is a great mistake. Further, pay close attention to the amount of light that is accessing the plant. If you are a beginner, it is important to note that the growth of the plant slows down at this stage.
This is because the root system is developing at this stage. Also be very keen on the fertilizer, if you excessively water it or over-fertilize the plant, it will die.
Also, remember that the seedlings require 16 hours of light daily. Ensure that you set the light to 15% for red, 30% for blue, and 30% for white.
Step 4: Transplanting

Whether the seedling is grown in a pot or a wool tray, it is time to transport the seedlings into the hydroponic or garden system. During the transplanting process, dig a hole in the soil and place the seedling slowly inside.
Step 5: Monitor the plants growth

Now that the plants are developing into a strong crop, you need to observe the plant keenly. The first step is to keep an eye on the nutrition of the plant, ensure that there is no deficiency or excess supply. The two have similar signs, which include the discoloration of the plants.
You can determine if the plant is growing healthy during the third to the fifth week. If during this period the plant has dense and strong branches and is green in color, the plant is growing well.
At times, the stems may turn into purple color. Don’t get discouraged; it is normal. The discoloration is a result of the plant’s genetics.
It is important to ensure that the nitrogen levels are low in female plants; however, make sure it is not extremely low to prevent the leaves from yellowing. Likewise, ensure that the potassium levels are low in the female plants, for the male plants you are encouraged to maintain high levels.
If the potassium levels are too low, the leaves will turn yellow, and the tips will turn brown. Too low and you’ll see a brown burnt-look to the tips and edge of the leaves, turning yellow further into the leaf.
Also, try to control the humidity and temperature levels when growing plants indoors. Increased levels of humidity increase the growth of female plants, while low levels of humidity are good for the male plant.
Similarly, with the temperatures, low-temperature levels are used in the growth of female plants while the high temperature is recommended for male plants. We have highlighted the humidity and temperature levels for female weed plants in different stages; they include:
- At the seedling level – 20 to 25 ºC when the lights are switched on and 4 to 5 ºC when the lights are switched off. The humidity levels should be at 60% to 70%.
- At the vegetative stage – 22-28 ºC. The humidity levels should be 40% to 70%.
- At the flowering stage – 20 to 26 ºC. The humidity levels should be below 55%.
- The late flowering stage -18 to 24 ºC. The humidity levels should be 30% – 40%.
With lighting, we suggest the blue spectrum light boost the growth of female plants and the use of the red spectrum to advance the budding process. Below are the light settings of marijuana growing:
- At the seedling level – 15% for red, 30% for blue, 30% for white. As soon as the leaves go above the ground switch to 30% for red, 60% for blue, 60% for white.
- At the vegetative level – select 30/60/60 or 60/100/100 depending on the type of the plant.
- At the flowering level – Select 100/100/100.
- At the late flowering level – Select 100/70/100.
We also recommend the following nutrients for the growth of cannabis:
Nitrogen
It is the most important nutrient that helps in stem and leaf growth. Inadequate nitrogen leads to the discoloration of the leaves. Therefore, ensure that your plants are well supplied with nitrogen, especially during the vegetation stage, to ensure that the plant grows in the best way.
Phosphorous
This nutrient plays a major role in photosynthesis and respiration. You are advised to use additional phosphorous than nitrogen during the flowering stage.
Potassium
Potassium is essential in building and transferring sugars for cannabis plants. Besides, it plays an inevitable role in the absorption of water and nutrients, leading to the growth of the plants.
Step 6: Growing seedlings to mature plants
Now that you have learned important things about marijuana, it is time to select the best medium to grow marijuana indoors. We are going to focus on three types of media, namely:
- Growing with soil.
- Growing Hydroponically.
- Growing by Cloning.
Though the three processes will produce similar results, we recommend beginners to use soil as a means of cultivation. This is because growing marijuana with soil has fewer risks as compared to other techniques.
Nonetheless, we will give you a guide of the three growing methods to enable you to select the best method that suits your needs.
Growing weed with soil
This is a cheap and reliable method. For beginners, it is easy to grow the crop in containers in a bid to reduce the chances of failure. The container can be a box, bucket, or pot. All you are required to do is make a small hole at the bottom to drain out excess water.
Also, make sure the container is black and dark to ensure that light doesn’t access the roots. You can start with small containers because they are easy to use, but as the plant grows longer, you can shift the plant to a larger container.
However, if you are growing weed in the ground, you need to find some suitable space with abundant sun. You will entirely need to be careful with the spacing of the cannabis plants (try to leave a space of 3-4 feet for the cannabis plant) for maximum productivity.
Also, remember to select the best type of soil. The soil should be drainable and with the capability of retaining some amount of water. Further, the soil should include a proper PH level and nutrients. Organic soil fulfils the above characteristics.
When growing on soil, be sure to read our guide on home made organic fertilizers.
Also be sure to read our article on creating your own worm bin.
Transplanting cannabis plants into the soil
This involves moving the plant from a small container to the cultivating area or a bigger ground. The method is easy, and you only need to remove the plant from the container carefully together with the roots and the surrounding soil and place it in a new hole. We recommend that the transplanting is done at night to enable the plant to rest before the light starts and stimulates photosynthesis.
Watering the plants in the soil
Watering the cannabis plant depends on the light’s intensity and container size. Nonetheless, you need to water the crops every day. Roots also require air, so a little dryness can be healthy for the plant, but if the plant is too dry, it will die from dehydration.
Also, ensure that the PH level is well monitored for the survival of the marijuana plant. The PH level should always range between 6.7 to 6.2. Overfeeding the plant with excess fertilizers and organic compounds may easily lead to the destruction of the entire crop. The most fertilizer to use is common manure. You don’t need to look for extraordinary fertilizer to grow marijuana.

Cloning as a method of growing marijuana
Cloning is the process by which you select some donor plants, take a cutting from the plant and grow them in a different medium – it is a process of creating mini plants from the original plant. The merit of this crucial method is that each clone ends up as a female plant.
Step to step guide of cloning
The most important point is selecting the mother plant; ensure that it is healthy and productive. You are also advised to cut the clones before the flowering period begins.
Once you have the cut, dip it in growth hormone and later place it on a medium, either a rapid rooter or a Rockwool.
Afterwards, place the cutting in a dome that regulates humidity levels and temperatures for a period of five to fourteen days. However, during this period, you should constantly lift the lid to allow air exchange.
After the dome is removed, you can start watering the plant every day as you check if the plant has rooted. Rooting takes a period of 5days to ten days.
At this stage, you will see some leaves turning yellow. Do not panic; the yellowing happens because the plant has consumed all the nutrients from its leaves and is weak at this stage.
Also, check if the plant is wilting at this stage. If there is no wilting at this stage, you can move to the next step. The next step involves planting the clones under led grow light or planting them outside. If you follow the above criteria, you are assured of a successful experience.
Be sure to read our guide: How to know if your clone is rooting, and extra tips to make them root better.
Using hydroponics to grow marijuana

This method produced the best yields. Below is a step by step guide for growing marijuana.
Stage 1: Initial preparations
Collect all the requirements that are needed; they include containers, seeds or clones, hydroponic nutrients, lighting system, growing medium, and PH detector. Then you will prepare your walls to light paint that can reflect on the plant.
Stage 2: Lighting
Next, set up the lights for maximum coverage of the plants. If you settle on High-Intensity Discharge lights, the rule should be 40 watts per square foot. If you are using LED light, ensure that the light Photosynthetically Active Radiation has enough value- the value should range between 400nm to 700nm.
We could go in-depth on guiding you on light distribution; however, since you are a beginner, we will only share the simplest rule. It states that you should ensure that light covers a minimum of 32 watts per square foot.
Stage 3: Humidity, nutrients, temperature, and ventilation
You can only subject the marijuana to a maximum temperature of 90 degrees Fahrenheit.
As you feed your plants in the hydroponic system, ensure that the PH level ranges between 5.0 to 6.0. Overfeeding the plant with extra nutrients will damage the plant quickly. Start with a small number of nutrients then increase slowly.
During this stage, the plant requires extra care to guarantee the maximum yield. Keep an eye on the lighting, PH levels, and nutrients. Also, remember as the plants grow in height, they approach lighting, so you need to ensure that the lighting is not excess.
Stage 4: Vegetation and flowering.
After the seeding stage, the next phases are vegetation and flowering.
The first step is to ensure that the environmental conditions are ideal for maximizing the yield.
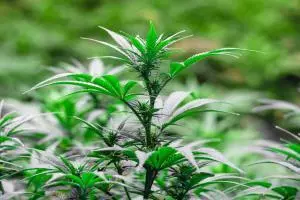
During the vegetative stage, the plant grows till the height is 6 to 18 inches. Once the plant is 18 inches, the flowering process starts.
As the flowering process begins, you will be able to identify the sex of the plant. Female plants start flowering by growing white hair around the branches while male plants begin flowering when they produce grape balls.
Ensure that you remove all the male plants and hermaphrodites to avoid self-pollination. Also, check if the female plants are stressed; this is because they might develop bud sacs. To avoid losses, cut them immediately or begin harvesting.
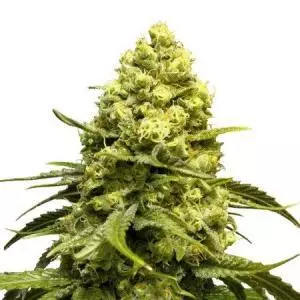
The last flowering stage is the most demanding phase; it requires a lot of patience. It takes a period of 6 to 12 weeks for the cannabis to mature; however, this depends on the type of strain you are growing.
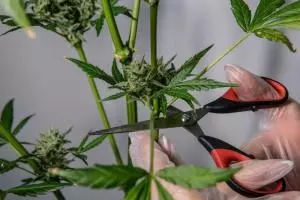
Stage 5: Harvesting
This is the last stage. One week to the harvesting period, feed the plants with water. If you add any other nutrients during this stage, you will affect the taste of weed.
If 50% of the pistils turn red, the flavor will be higher. If 70% are brown, the weed will be stronger, and if 90% turn brown, the effects will be narcotic, and the taste will be heavy. Other signs that indicate it is harvesting time include the broadening of the stem.
You may also plan for the harvesting. Normally, you should harvest Cannabis Indica after eight weeks of the flowering stage while Sativa should be harvested after 12 weeks of the flowering stage.
Is Light important for growing marijuana indoors?

The key factor in producing marijuana is ensuring that the plant receives adequate light.
Remember that cannabis is a short-day plant. Short day plants transform from the vegetative stage to the floral stage when they are exposed to light. For marijuana, it requires a minimum of 12 hours of light; however, most growers expose cannabis to 16 hours or 18 hours during the vegetative stage.
Therefore, the crop will not grow if the right amount of lighting is not provided. Whether the plant is growing in a hydroponic system or soil medium, the correct lighting should be supplied.
For crops growing indoors, you should use artificial lighting. The most commonly used source of artificial lighting is the LED fluorescent light bulbs. The HID lights may be scarce in some areas, but the LED bulbs are available everywhere. In the past, the LED bulbs were not ideal, but due to technological advancement, they can produce a full spectrum of light.
The ideal placement of your light depends on the source you are using. If the bulbs emit heat, then you will need to place them a bit higher; however, if you are using LED bulbs, you can hang them 10 inches from the plant.
It’s important to note that during the stages of growth, cannabis requires different lighting schedules as listed below:
- For the seedling stage, marijuana requires 16 hours to 18 hours of lighting.
- For the vegetative stage, marijuana requires 18 to 24 hours of lighting.
- For the flowering stage, marijuana requires 12 hours of lighting and an increase in the red spectrum.
When do you fertilize the plant

At the very beginning of this write-up, we stated that carbon dioxide, light, nutrients, and water are crucial in the growth of the cannabis plant. Well, leaves are responsible for acquiring carbon dioxide and light while roots are responsible for acquiring nutrients and water.
When seedlings are planted, they use stored energy in the leaves for growth. They don’t need additional nutrients from fertilizers at this stage. However, after some time, all the energy is consumed. At this stage, you can feed the plant with the first nutrients. So when is the right time to feed your marijuana plant with nutrients?
As soon as the plants grow 3 to 4 sets of leaves, you can feed them with nutrients. It takes a period of 3 to 4 weeks for the plant to use up all the energy in the seed. At this stage, the roots can now start consuming nutrients from the soil and added fertilizer.
The first step involves transplanting the plant to a larger pot and giving it the first dosing. This ought to get done on the first day of the vegetative stage.
The size of the plant will determine the amount of fertilizer each plant should receive. The rule of thumb to feeding the plant is ensuring that there is a 20% runoff of water. Let’s say you feed the plant with 2L nutrients; there should be a 400ml run off of the water.
The runoff will guarantee saturation. Another trick can be pre watering the soil 30 minutes before feeding them with nutrients. This will enable the plants to suck the nutrients faster.
Final thoughts
This grower’s guide will direct beginners who have been confused by technical books in starting. We are not saying that technical books are wrong; in fact, we gathered most of the information from the books.
The problem is that those books are not aimed at beginners. You are likely to get lost due to the terminologies used. We have written the above beginner guide with a focus on starter information in a convenient manner.
The guide will get you started, the rest you will learn on the way as you perfect your skills. As pf the moment, we wish you the best as you start your weed growing career!